child seat TESLA MODEL S 2018 Owner's Manual
[x] Cancel search | Manufacturer: TESLA, Model Year: 2018, Model line: MODEL S, Model: TESLA MODEL S 2018Pages: 195, PDF Size: 5.51 MB
Page 2 of 195

Overview............................................................. 2
Interior Overview.........................................................................2
Exterior Overview....................................................................... 3
Opening and Closing..................................... 4 Doors............................................................................................... 4Windows.........................................................................................9Rear Trunk.................................................................................... 10 Front Trunk...................................................................................13Glove Box......................................................................................15Sunroof.......................................................................................... 16Cup Holders................................................................................. 17
Seating and Safety Restraints................... 18 Front and Rear Seats............................................................... 18Seat Belts...................................................................................... 21 Child Safety Seats.................................................................... 24
Tesla Built-In Rear Facing Child Seats............................... 31 Airbags......................................................................................... 35
Driving...............................................................39 Driver
Profiles............................................................................ 39
Steering Wheel........................................................................... 41 Mirrors.......................................................................................... 44Starting and Powering
Off.................................................... 45
Gears............................................................................................. 46 Instrument Panel.......................................................................47 Lights.............................................................................................53Wipers and Washers............................................................... 58Brakes........................................................................................... 60Traction Control........................................................................ 63Park Assist.................................................................................. 64 Vehicle Hold............................................................................... 66Acceleration Modes................................................................. 67
Trip Information........................................................................ 69Getting Maximum Range...................................................... 70Rear View Camera.................................................................... 72
Driver Assistance.......................................... 73
About Driver Assistance........................................................ 73
Traffic-Aware Cruise Control............................................... 76
Autosteer..................................................................................... 82 Auto Lane Change................................................................... 85
Autopark...................................................................................... 87 Lane Assist................................................................................... 91Collision Avoidance Assist.................................................... 93Speed Assist............................................................................... 97
Using the Touchscreen............................... 99 Touchscreen Overview........................................................... 99
Controls...................................................................................... 104 Settings.......................................................................................107Climate Controls........................................................................ 111Smart Air Suspension............................................................. 117
Media and Audio...................................................................... 119 Phone...........................................................................................124 Maps and Navigation............................................................. 126Calendar.......................................................................................131Security Settings..................................................................... 132 HomeLink
Page 8 of 195

Child-protection LockModel S has child-protection locks on the rear
doors and liftgate to prevent them from being
opened using interior handles. Use the
touchscreen to turn child protection locks on
or
off. Touch Controls > Settings > Doors &
Locks > CHILD-PROTECTION LOCK .
Note: It is recommended that you turn child-
protection locks on whenever children are
seated in the rear seats.
Drive-away Locking Model S automatically locks all doors
(including the trunks) whenever your driving
speed exceeds 8 km/h.
Walk-away Locking
Doors and trunks can automatically lock whenever you walk away carrying the key.
To turn this feature on or
off, touch Controls >
Settings > Doors & Locks > WALK-AWAY
DOOR LOCK .
Note: Depending on date of manufacture and
options selected at time of purchase, some Model S vehicles are not equipped with the
Walk-way Door Lock feature.
Note: If all doors are closed and you use the
key to unlock Model S, walk-away locking is
temporarily suspended for one minute. If you
open a door within this minute, it does not re-
lock until after all the doors are closed and
you have walked away with the key.
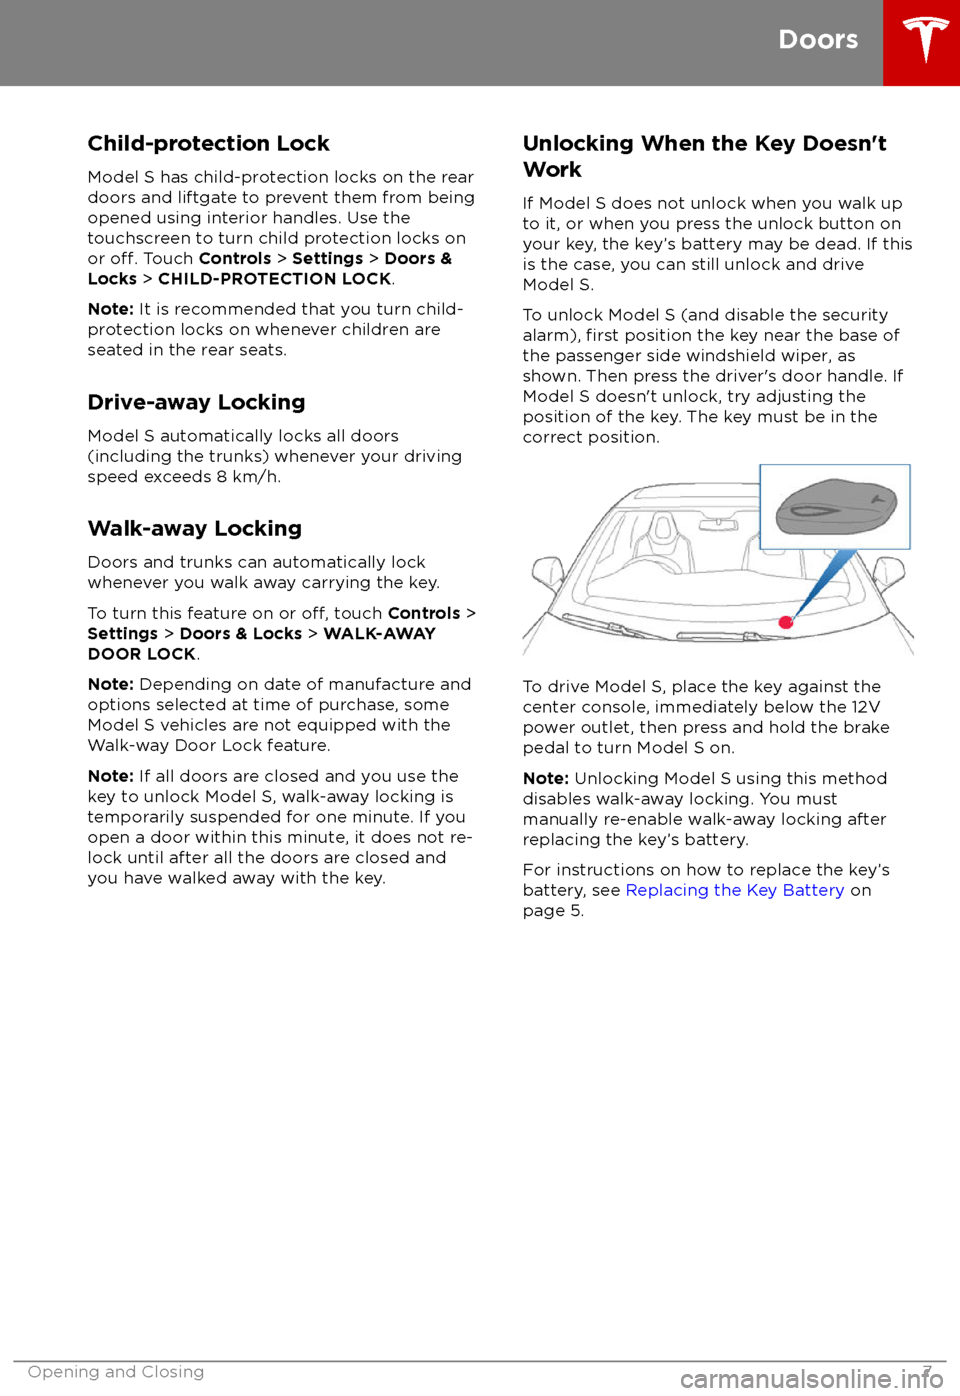
Unlocking When the Key Doesn
Page 12 of 195

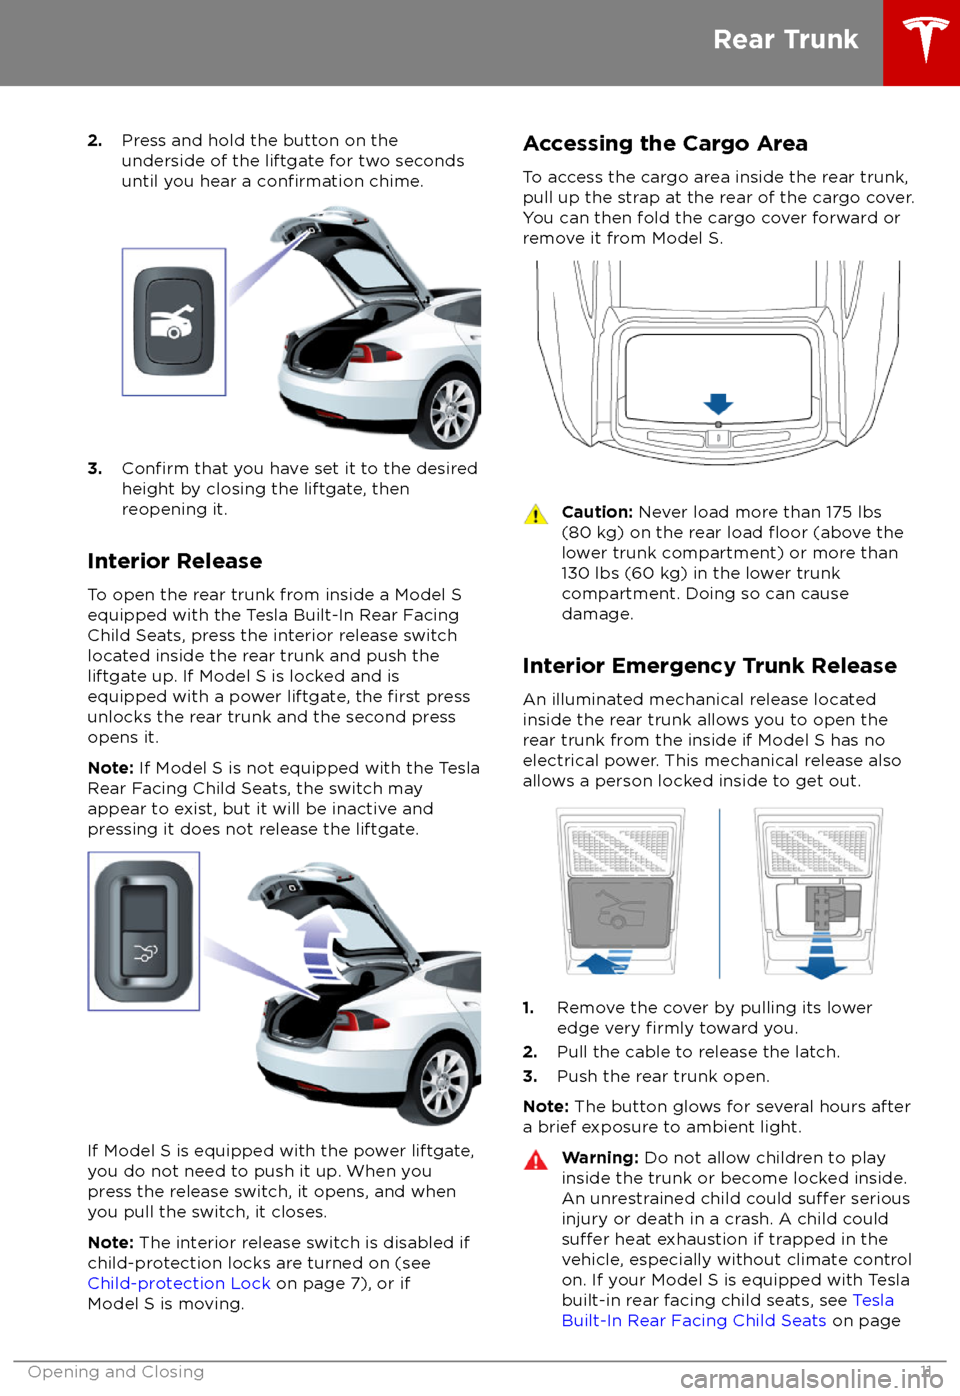
2.Press and hold the button on the
underside of the liftgate for two seconds
until you hear a
confirmation chime.
3.Confirm that you have set it to the desired
height by closing the liftgate, then
reopening it.
Interior Release To open the rear trunk from inside a Model S
equipped with the Tesla Built-In Rear Facing
Child Seats, press the interior release switch
located inside the rear trunk and push the liftgate up. If Model S is locked and is
equipped with a power liftgate, the
first press
unlocks the rear trunk and the second press
opens it.
Note: If Model S is not equipped with the Tesla
Rear Facing Child Seats, the switch may
appear to exist, but it will be inactive and
pressing it does not release the liftgate.
If Model S is equipped with the power liftgate,
you do not need to push it up. When you
press the release switch, it opens, and when you pull the switch, it closes.
Note: The interior release switch is disabled if
child-protection locks are turned on (see
Child-protection Lock on page 7), or if
Model S is moving.
Accessing the Cargo Area
To access the cargo area inside the rear trunk,
pull up the strap at the rear of the cargo cover.
You can then fold the cargo cover forward or
remove it from Model S.Caution: Never load more than 175 lbs
(80 kg) on the rear load floor (above the
lower trunk compartment) or more than
130 lbs (60 kg) in the lower trunk
compartment. Doing so can cause
damage.
Interior Emergency Trunk Release
An illuminated mechanical release located
inside the rear trunk allows you to open the
rear trunk from the inside if Model S has no
electrical power. This mechanical release also
allows a person locked inside to get out.
1. Remove the cover by pulling its lower
edge very firmly toward you.
2. Pull the cable to release the latch.
3. Push the rear trunk open.
Note: The button glows for several hours after
a brief exposure to ambient light.
Warning: Do not allow children to play
inside the trunk or become locked inside.
An unrestrained child could
suffer serious
injury or death in a crash. A child could
suffer heat exhaustion if trapped in the
vehicle, especially without climate control
on. If your Model S is equipped with Tesla
built-in rear facing child seats, see Tesla
Built-In Rear Facing Child Seats on page
Rear Trunk
Opening and Closing11
Page 22 of 195

Wearing Seat BeltsUsing seat belts and child safety seats is the
most
effective way to protect occupants if a
collision occurs. Therefore, wearing a seat belt is required by law in most jurisdictions.
Both the driver and passenger seats are
equipped with three-point inertia reel seat
belts. Inertia reel belts are automatically
tensioned to allow occupants to move
comfortably during normal driving conditions.
To securely hold child safety seats, all
passenger seating positions are equipped with
an automatic locking retractor (ALR) that, by
pulling the seat belt beyond the length
needed for a typical adult occupant, locks the
belt into place until the seat belt is unbuckled
(see Installing Seat Belt Retained Child Seats
on page 27).
The seat belt reel automatically locks to
prevent movement of occupants if Model S experiences a force associated with hardacceleration, braking, cornering, or an impact
in a collision.
The seat belt reminder on the
instrument panel alerts you if a seat
belt for an occupied seat is not
fastened. If the belt remains unfastened, the reminder
flashes and
an intermittent chime sounds. If all
occupants are buckled up and the
reminder stays on, re-fasten seat
belts to ensure they are correctly
latched. Also remove any heavy
objects (such as a briefcase) from an
unoccupied seat. If the reminder
light continues to stay on, contact
Tesla.
To Fasten a Belt
1. Ensure correct positioning of the seat (see
Correct Driving Position on page 18).
2. Draw the belt out smoothly, ensuring the
belt lays
flat across the pelvis, chest and
mid-point of your collar bone, between
the neck and shoulder.
3. Insert the latch plate into the buckle and
press together until you hear a click
indicating it is locked in place.
4. Pull the belt to check that it is securely
fastened.
5. Pull the diagonal part of the belt toward
the reel to remove excess slack.
To Release a Belt
Hold the belt near the buckle to prevent the
belt from retracting too quickly, then press the
button on the buckle. The belt retracts
automatically. Ensure there is no obstruction
that prevents the belt from fully retracting.
The belt should not hang loose. If a seat belt does not fully retract, contact Tesla.
Wearing Seat Belts When Pregnant Do not put the lap or shoulder sections of the
seat belt over the abdominal area. Wear the lap section of the belt as low as possible
across the hips, not the waist. Position the
shoulder portion of the belt between the
breasts and to the side of the abdomen. Consult your doctor for
specific guidance.
Seat Belts
Seating and Safety Restraints21
Page 24 of 195

dangerous to put a seat belt around a
child being carried on an occupant
Page 25 of 195

Guidelines for Seating Children
You must restrain infants and small children using a child safety seat appropriate for the child
Page 26 of 195

Choosing a Child Safety Seat
Refer to the tables below for guidelines on the type of seat belt installed and ISOFIX installed
child restraint you should use based on the weight of the child.
Seat Belt Installed Child RestraintsMass GroupFront Passenger*Rear OutboardRear CenterGroup 0up to 10 kgXUUGroup 0+up to 13 kgL**UUGroup I9 - 18 kgUF***U, UFU, UFGroup II15 - 25 kgUF***U, UFU, UFGroup III22 - 36 kgUF***U, UFU, UFU: Universal rear facing child restraint.
UF: Universal forward facing child restraint.
L: Suitable for these particular child restraints - Maxi-Cosi
Cabrio/Cabriofix E4 04443517 or
Takata Mini E4 04443717.
X: Seating position is not suitable for children in this mass group.
* It is the driver
Page 27 of 195

ISOFIX* Installed Child Restraints
Mass GroupSize ClassFixtureRear Outboard
ISOFIX PositionGroup 0up to 10 kgER1
Note: Attach
booster seats
using seat belts
only (do not use ISOFIX).IL
Group 0+up to 13 kg
ER1ILA, CDR2ILA, CCR3ILA, C
Group I9 - 18 kg
DR2ILBCR3ILBBF2IUF, ILB, DB1F2XIUF, ILB, DAF3IUF, ILB, DIL: Suitable for any semi-universal child restraint (any rear or forward facing restraint with
support leg).
IUF: Suitable for any universal child restraint (forward facing with tether).
ARecommendation: Takata Mini E4 04443717.
BRecommendation: Takata Midi E4 04444204.
CRecommendation: Maxi-cosi
Cabriofix/Easyfix E4 04443517.
DRecommendation: Maxi-cosi
Pearl/Familyfix E4 043908.
Note: ISOFIX is the international standard for attachment points for child safety seats in
passenger vehicles.
Note: If the combined weight of the child and the child safety seat is over 29 kg, Tesla
recommends attaching the safety seat using the seat belt and upper tether strap. In addition to
safety, this has the added
benefit of ensuring the seat belt reminder does not stay lit. Always
follow the child safety seat manufacturer
Page 28 of 195

Seating Larger ChildrenIf a child is too large to
fit into a child safety
seat, but too small to safely fit into the
standard seat belts, use a booster seat
appropriate for the child
Page 29 of 195

Install ISOFIX child safety seats in the
outboard seating positions only. Use only a seat belt retained seat in the center position.
To install a ISOFIX child safety seat, slide the
safety seat latches onto the anchor bars until
they click into place. Carefully read and follow
the instructions provided by the child safety
seat manufacturer.
Once installed, test the security of the installation before seating a child. Attempt to twist the child safety seat from side to side
and try to pull it away from the seat, then
check to ensure the anchors remain securely
in place.
Note: Lower LATCH anchors should not be
used with child seats or booster seats that
have an integrated safety belt in situations
where the combined weight of the child plus
the child restraint is more than 65 lbs (29 kg). In these situations, use the safety belt instead.
Attaching Upper Tether Straps If an upper tether strap is provided, attach its
hook to the anchor point located on the back of the rear seats.
Note: The location of anchor points may not
be readily visible but can be found by
identifying a slice in the seat